
Spaces are the individual items that users will book in your Booking System.
You create, and configure, Spaces from the Manage Spaces page; this page allows you to define the physical or logical areas that your users will interact with—whether bookable or simply for grouping.
In our worked example Booking System, we will create spaces that represent the shared delivery bays that can be booked by retail units.
Unbookable items help structure your system. Again, using our worked example, we will create spaces to represent the delivery zones in our centre and in which our delivery bays are located.
Instructions
-
Navigate to the Booking menu in the top navigation.
-
Select your Booking System, then click the “Manage Spaces” button.
For each space or asset that you wish to create:
- Click Add Space
This will create the Space in the Booking System and give it a default name, e.g. “Space 1”; it will then be displayed in the left-hand menu on the Manage Spaces page:

We have created seven Spaces in our Booking System (before starting to edit them) but you can create them as you need them.
To configure a Space (or edit the configuration):
- Click the title of the Space that you wish to configure in the left-hand menu to display the Edit Space Details form (as shown below).
The different elements of the form are described in the section below the screenshot.
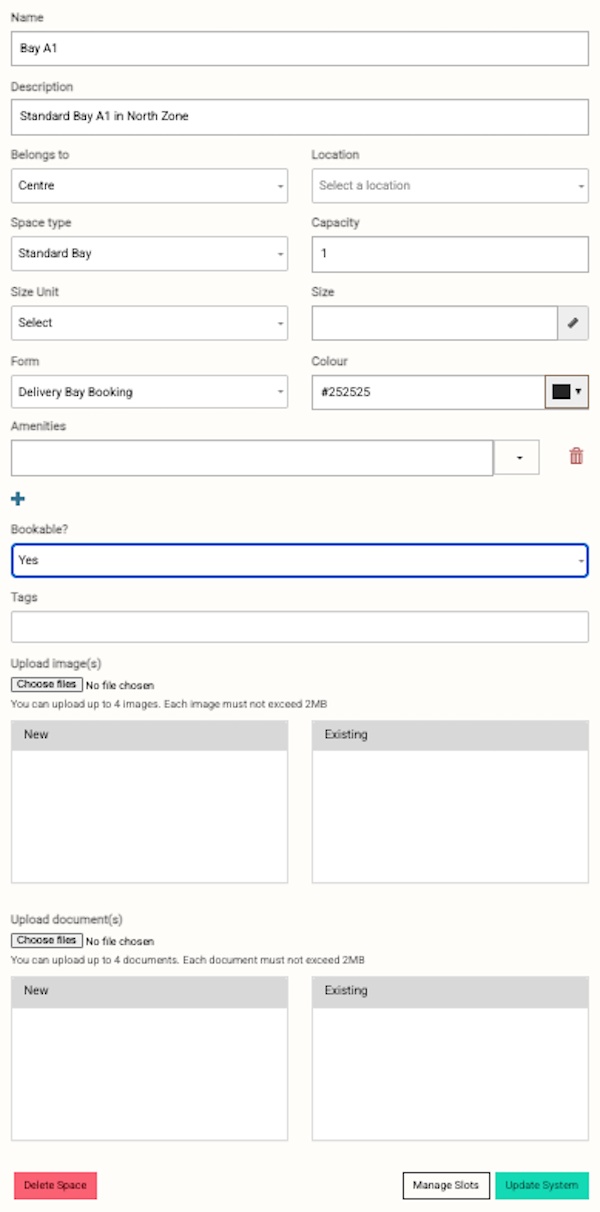 Space Details form
Space Details form elements:
Name
This is the name of the Space; the name will be displayed to the Booking App User.
The name is also used for reference within the Booking System, i.e. it will be the label used in the Manage Spaces page and be displayed against bookings.
Description
Location
You are able to leverage your pre-defined Location options against Spaces or create new Location options on the fly, directly from the Manage Spaces form.
The Location for a Space is also displayed in the App to users wishing to make a booking.
Space Type
Capacity
The Space capacity is also displayed in the App when the user views a Space and the user can specify the number of people that they are booking for.
If you want the Space to be bookable (see Bookable? section below), you must specify a Capacity of at least 1.
Size Unit
Size Value
Form
A Booking Template form is required to enable users to make a booking. This form should include all the questions that must be answered when a booking is submitted.
Please note that Booking Template forms cannot be created directly by you in Kinexio. Instead, simply let us know the details and requirements you would like included, and our team will create the template for you using Kinexio’s Form Builder. We’ll make sure it matches your needs and is set up correctly.
You can also choose to use different Booking Template forms for different Spaces within a Booking System if required.
Colour
You could use this setting to define a colour scheme that meets your own requirements; for example, by using the same colour to identify a particular group, size of space, or maximum capacity.
Amenities
The Amenities section allows you to define characteristics of the Space that you wish to highlight for the person that will be booking the Space in the App.
When creating an Amenity entry, you are able to select an icon and specify a description.
The Amenity icons will be displayed against the Space Listing on the Available Spaces page (in a label). When the user accesses a Details page, which is shown after the user selects a Space from the Available Spaces page, the Amenities are also listed in an Amenities section on the Space Details tab.
Bookable?
The Bookable? field defines whether the Space can be booked; the default value is “No”. In order to be able to make bookings against a Space, the Bookable? field must have a value of “Yes”.
If a Space is bookable, it will be displayed in the CMS Calendar view (along with any of its bookings). It will also be displayed in the App allowing users to make bookings for the Space.
Spaces that are set to non-bookable can be used to organise your Spaces in a hierarchy on the Manage Spaces page; see Step 6 of 6 - Finalise and Organise for more information.
Images
The Images field allows you to add images to the Space listing in the App.
You can add up to four images and each image must not exceed 2MB in size.
The App will automatically use the first image that you add to the Space as image displayed in the Available Spaces page.
If you upload more than one image, these can be viewed in the Details page in the App, which is shown after the user selects a Space from the Available Spaces page; the user is able to use left and right arrows on the image pane to see all the images.
Documents
As with the Images field, the Documents field allows you to upload documents to the Space listing that are then accessible in the App.
You can add up to four PDF documents and each PDF must not exceed 2MB in size.
Please note: the filename is used in the App, so you should consider what filename you want your end-user to see.
Documents are listed in the Details page in the App, below the Amenities section; the user can click on document and the document will open inside the App for them to view.
Please note: It is possible to edit multiple Spaces, then click Update System to save all changes at the same time; it is not necessary to click Update System after each Space is edited but you can manage Spaces in whichever way you wish.