After Kinexio Professional Services have created a new Booking System, the settings for that Booking System will need to be configured. This step allows you to define the logic of your Booking System: what types of spaces exist, how bookings flow between states, and what notifications get sent.
To access the Settings page, click the Settings button:
From the Settings page, you will be able to see the following Settings page tabs:

Each of the tabs is detailed below describing their purpose:
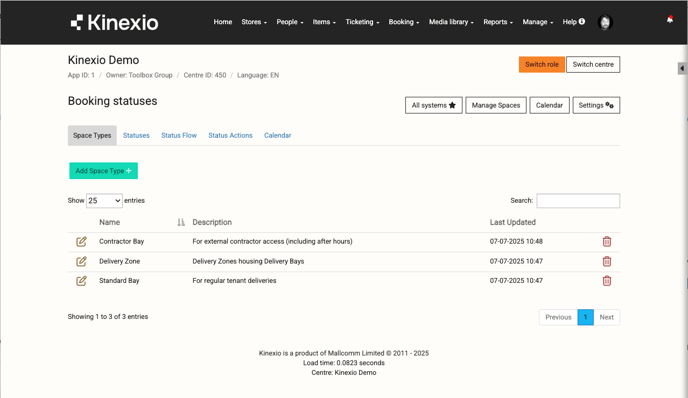
Space Types
This tab is used to create the categories of spaces that will exist in the Booking System; it’s very flexible and you can create Space Types for spaces/assets that will be booked as well as Space Types for spaces/assets that will not be bookable - that allows you to create system hierarchies. Space Types help organise the system but do not affect visibility or permissions directly.
You must create at least one Space Type in order to be able to create Spaces.
The Bookable? setting is applied later when creating each space—not in the Space Types tab.
In our worked example, we’re going to create three Space Types:
-
Delivery Zone,
-
Standard Bay, and
-
Contractor Bay
Statuses
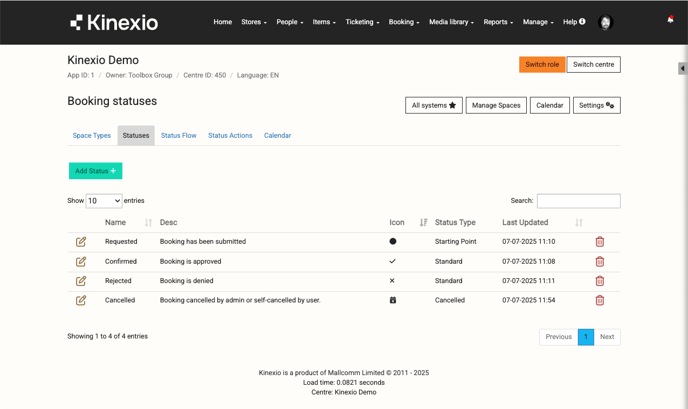
The Statuses tab allows you to define the different states that a Booking can be in.
You must have at least one Status and, when a Booking System is created, a default Status is automatically added - “pending”.
Note: The system-generated “pending” Status is created because each Booking System must have at least one Status.
It is worth noting, however, that this “pending” Status can be edited.
Statuses are created by clicking the Add Status button and completing the Add Status form:
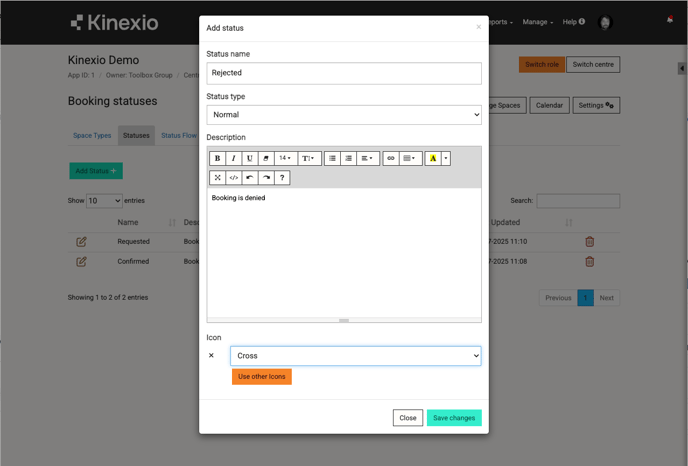
The Add Status form has the following fields:
-
Name
The name for the Status -
Status type
There are three options for Status Type:-
Starting Point
You must select one status as the starting point—this is where bookings submitted via the app will begin. -
Normal
This a standard Status Type and can be used as required in Booking System statuses, -
Cancelled
This type is used to indicate cancelled bookings. Any booking slots in a status with a Cancelled Status Type will be available for re-booking.
-
-
Icon
The icon is used on the Calendar view for the Booking system and provides a quick view of Bookings status.
In our worked example, we’re going to create four Statuses:
Status Flow
Status Flows are used to control how Bookings can move between Statuses in a workflow.
In our worked example, we’ve created four Status Flows indicating permissible flows from one status to another:
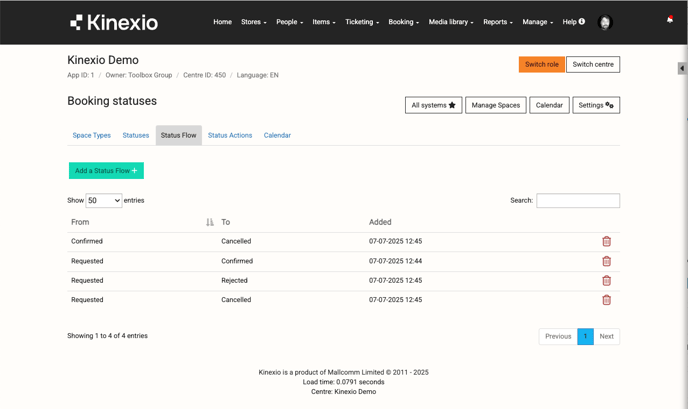
If a Status Flow is not defined here, the Booking will not be able to move between those Statuses. For example, we have not defined a Status Flow from Rejected to Confirmed because, in our example, that would not be allowed.
Status Actions
Status Actions are optional but allow automated notifications to be configured for your Booking System; this can be useful for users and Booking system admins.
There are a number of actions that can be triggered on a user-defined status transition; these are split into two categories:
-
Push Notification
A Push Notification action can be configured to automatically send to the following persons/groups:-
Booking Organiser,
-
Booking Guests,
-
Access Level,
-
Store,
-
Please note you can create multiple Status Actions for the same Status transitions. For example, you might want to send an email to Booking Organisers when a meeting room Booking is confirmed (i.e. the Status changes from Requested to Confirmed). You might also want to send an email to a Facilities Management Team (Store) to let them know, which might be a trigger for them to ensure that the meeting room is prepared ahead of the booking time.
-
Email
As with the Push Notification action, an Email action can be configured to automatically send to the following persons/groups:-
Booking Organiser,
-
Booking Guests,
-
Access Level,
-
Store, but also
-
Custom
The Custom email option provides
-
In our worked example, we’ve created four Status Actions:
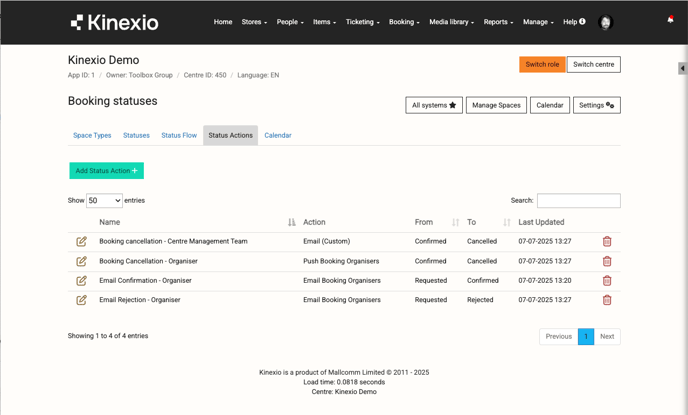
We have created the following actions:
-
Email Notifications that get sent to the Booking Organiser when their Booking request is actioned, i.e.:
-
If the Booking is confirmed and the Booking Status changes from Requested status to Confirmed status, or
-
If the Booking is rejected and the Booking Status changes from Requested status to Rejected status.
-
-
A Push Notification that gets sent to the Booking organiser when they cancel a Booking
-
A Custom Email notification that gets sent to our Centre Management team email address and our Security Team email address when a Booking Organiser cancels a Booking.
The screenshot below displays the Add Status Action form with the entries for an Email action that will automatically send an email to the Booking Organiser when the booking’s Status changes from the Requested status to the Confirmed status:

Add Status Action form - example
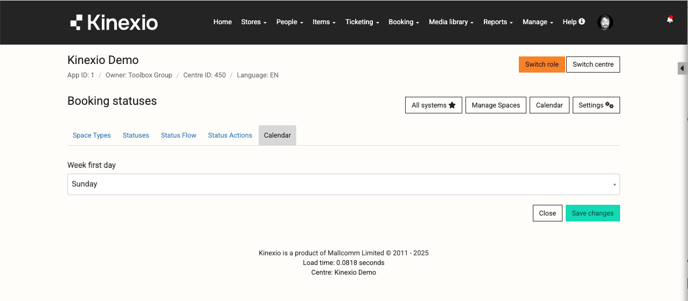
Calendar
The Calendar tab allows users to specify the day of the week on which their Booking System Calendar should start.