Creating a Booking
In the CMS
To create a booking:
-
Go to Booking in the top navigation bar.
-
Choose the Booking System in which you wish to create a booking via the dropdown.
-
You will see the All Bookings page with the default monthly calendar view for that Booking System.
At this point, you can create a booking by either of two methods:-
Click the Add Booking button (shown at the top-right of the All Bookings page)

This will open the Add Booking form allowing you to enter the required information to create the new booking.

Add Booking form
Once you have entered the required information, click Save booking to create the new booking.
-
Click on the day (in the month view) that you want to make a booking for.
This will take you to the day view, showing all available slots: Day View
Note: unbookable slots appear greyed out.
From the Day View, you can click on an available slot to display the Add Booking form (see section 3a above). Once you have entered the required information, click Save booking to create the new booking.
-
In the CMS, Booking System administrators can create bookings with any status, including bypassing approval steps by selecting a non-starting status such as “Confirmed”.
Editing a Booking
To edit an existing booking:
-
Navigate to the Calendar.
-
Click on the desired Booking to view its summary.

-
Click the green Edit button to open the Edit Booking form.
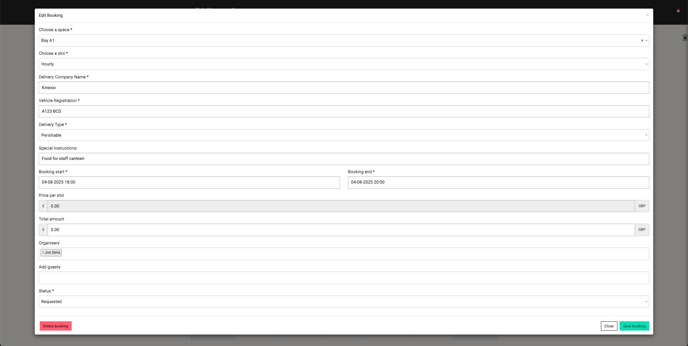
-
Make your changes and click the Save booking button.
Navigating the Calendar (CMS)
To view bookings and booking requests in your Booking System:
-
Go to the Booking menu in the top navigation bar.
-
Select your Booking System.
By default, the Calendar view will be displayed. From here, you can:-
Switch Calendar Views
Use the buttons at the top right to switch between Month, Week, and Day views. The Month view is displayed by default.
-
-
-
Filter by Space
Use the top-left Filter Spaces dropdown to specify the Space on which you would like to filter.
-
Access a Space-specific view
From the Day view:
Click on a Space link in the Resources panel in order to view a chronological list of all bookings for that space:

This view can be displayed as a Year, Month, Week or Day view by clicking the Year, Month, Week or Day buttons at the top-right of the view; the default for this view is Month.
-
View (or Edit) a Booking
See Editing a Booking (CMS) section above.
-
Approving Bookings (CMS)
To review and approve booking requests:
-
Go to the Booking menu in the top navigation bar.
-
Select your Booking System.
-
Click the Approve Bookings button.

The Booking Status page will be displayed:

The Booking Status page will display a list of bookings; the default is to display all bookings for all spaces for the last month:
You can use the Filter Status dropdown to display bookings in a specific status (e.g. “Requested”).
You can use the Filter Space dropdown to display bookings for a specific Space. -
To approve a booking, you will need to change the Status for the required booking, using the dropdown in the Status id column to update the required booking’s status.
You can also cancel bookings using the same method, as the Status id dropdown allows the Booking System administrator to select any Status.
Also note that any configured Status Actions (e.g. push notifications, email alerts) will be triggered automatically upon changing a status.
Further Reading
- Creating a Booking System
- Configure Booking System Settings
- Creating and Managing Spaces
- Creating and Assigning Slots
- Organise and Finalise your Booking System
- Bookings: Key Term Definitions